A sinking driveway is not actually a paver problem; it is a sub-base engineering failure. When you notice uneven stones or pooling water, you’re seeing the result of what lies beneath the surface. For most homeowners, the sight of a dipping driveway triggers immediate anxiety about trip hazards for family members or the devaluing of their home’s curb appeal. You shouldn’t have to worry about a total driveway collapse every time it rains. Mastering the art of preventing paver driveway sinking requires moving past quick fixes and addressing the structural integrity of your soil and aggregate layers.
We understand that your home is your most significant investment, and you deserve a surface that remains level for decades. This guide provides the technical knowledge you need to stop the cycle of shifting stones and standing water for good. You’ll learn the exact engineering principles required to stabilize your foundation and the specific repair techniques that actually work. We will also show you how to identify a contractor who prioritizes precision over speed, giving you total confidence in your next project.
Key Takeaways
- Master the engineering principles of sub-base stabilization, including the use of geotextile fabrics and class II permeable bases for preventing paver driveway sinking.
- Identify the root causes of surface failure, from poor mechanical compaction to drainage issues that liquefy bedding sand.
- Follow a systematic repair workflow to fix localized dips by excavating a precise perimeter and inspecting the underlying gravel foundation.
- Learn to distinguish between minor aesthetic settling and systemic structural failures that indicate the need for a full driveway replacement.
- Understand professional installation standards for the Bay Area to ensure your project benefits from local geological expertise and transparent pricing.
Why Paver Driveways Sink: Identifying the Root Causes
A sinking driveway is a symptom of structural failure beneath the visible surface. While the pavers themselves are durable, they rely entirely on the stability of the layers below. Understanding Pavement engineering principles is essential for anyone interested in preventing paver driveway sinking. Most failures stem from a handful of predictable issues: poor compaction, water mismanagement, or shifting soil. When these factors aren’t addressed during the initial installation, the driveway will inevitably fail under the weight of daily traffic.
The Role of Sub-Base Compaction
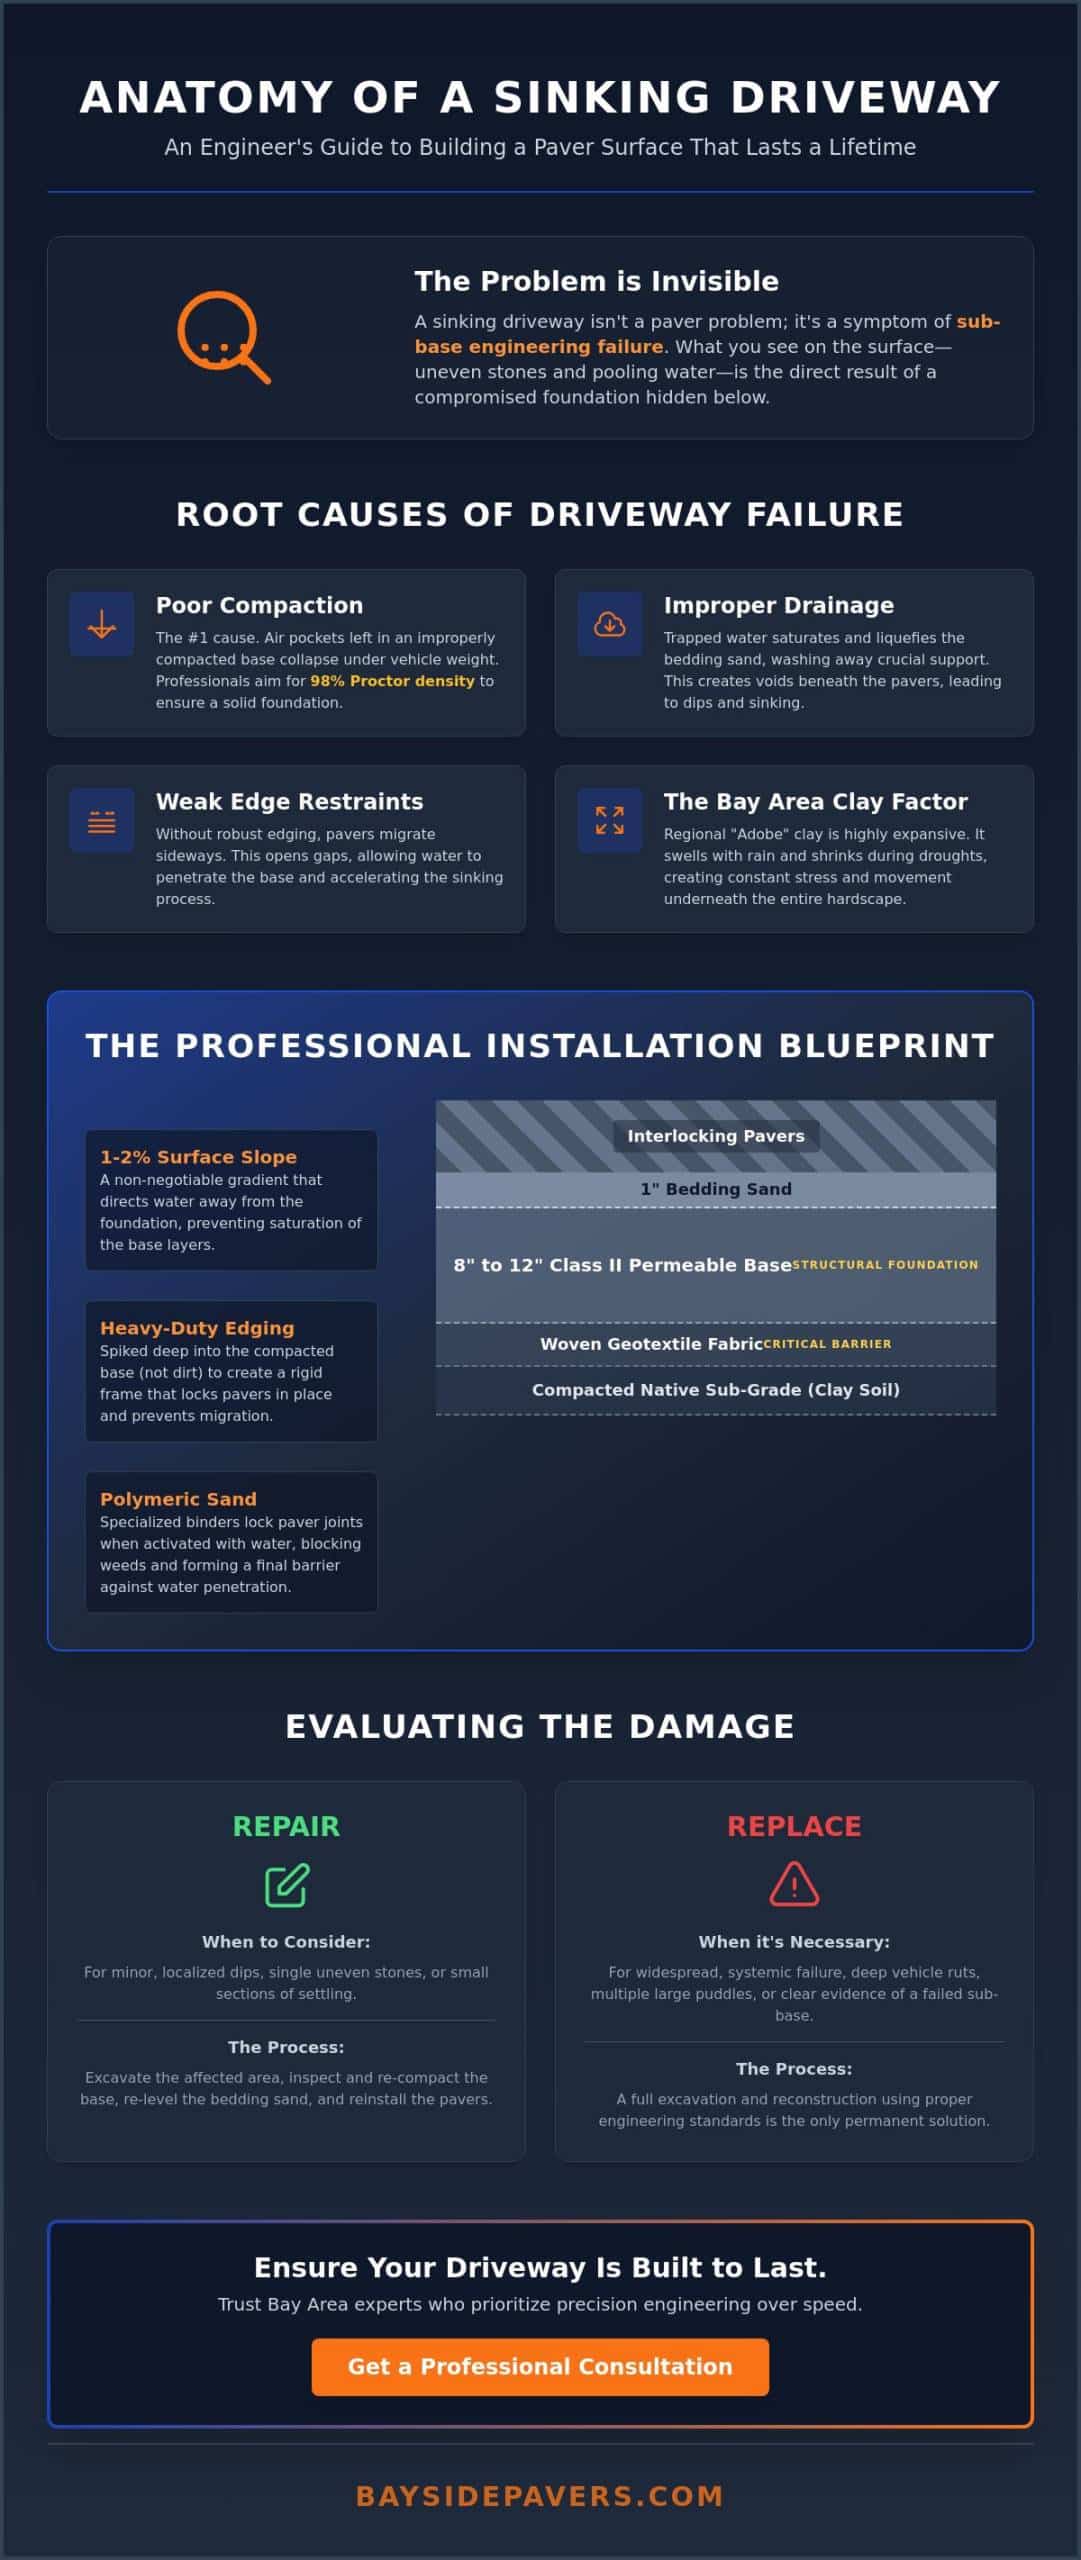
Poor sub-base compaction is the primary reason for premature driveway failure. In professional hardscaping, we aim for a 98% Proctor density standard. This metric ensures the soil is dense enough to support heavy vehicular loads without shifting. If a contractor rushes this step, tiny air pockets remain trapped within the soil layers. These voids eventually collapse under the constant pressure of your car. Sub-base compaction is the mechanical elimination of soil voids. Without it, your driveway is essentially floating on a foundation of air that will eventually give way.
Drainage issues also play a massive role in surface instability. When water cannot escape the driveway area, it saturates the bedding sand layer. This saturation can cause the sand to liquefy or wash away entirely. Once that middle layer is gone, the pavers lose their uniform support and begin to dip. Similarly, edge restraint failure allows pavers to migrate horizontally. When pavers move sideways, they create vertical gaps that allow more water to penetrate the base, which speeds up the sinking process.
Bay Area Soil Dynamics: The Clay Factor
In regions like Walnut Creek and Concord, “Adobe” clay presents a unique challenge for homeowners. Unlike sandy soils that drain quickly, clay is highly expansive. It acts like a sponge; it swells significantly when it absorbs California’s seasonal rains and shrinks during our long drought periods. This constant heave and sink cycle puts immense stress on any hardscape project. Local drought conditions followed by heavy winter rains accelerate sinking because the soil never reaches a state of equilibrium. Professional installers must account for this movement by using thicker aggregate bases and specialized fabrics to separate the clay from the driveway foundation.
Preventing Paver Driveway Sinking: The Engineering Approach
Preventing paver driveway sinking requires more than just adding more gravel. You must follow rigorous ICPI installation standards to ensure the surface remains stable under the weight of 4,000-pound vehicles. For a residential driveway, we install a minimum 8 to 12 inch class II permeable base. This layer provides the necessary structural support while allowing for proper drainage. We also prioritize a 1% to 2% slope away from your home’s foundation. This gradient is non-negotiable; it prevents water from pooling and compromising the sub-grade layers.
Geotextile Fabrics: The Secret to Longevity
In the Bay Area, the soft clay sub-grade is a constant threat to hardscape stability. Geotextile fabric acts as a critical bridge over this unstable soil. It prevents “fines” migration, which is the process of native soil mixing into your clean gravel base. When soil and gravel mix, the base loses its structural integrity and begins to sink. For driveways, we use woven geotextile fabrics because they offer superior tensile strength compared to non-woven varieties. This layer ensures your aggregate remains pure and compacted for the life of the installation.
Advanced Edge Restraints
A driveway is only as strong as its edges. Without proper containment, pavers will migrate horizontally over time. This movement creates gaps that lead to vertical sinking. We recommend heavy-duty plastic or metal edging, though concrete curb restraints offer the highest level of stability. The critical step is spiking the restraint into the compacted aggregate base, not the loose dirt. This creates a rigid frame that stops the “domino effect” of shifting stones. If you’re planning a new project, choosing an expert driveway installation team ensures these engineering details aren’t overlooked.
The final step in this engineering workflow is the application of high-quality polymeric sand. This is not standard play sand. It contains specialized binders that activate when wet, locking the joints into a semi-rigid state. This seal prevents water from infiltrating the bedding layer and stops weed growth from the top down. Precision here is vital. Improper application can lead to surface staining or joint failure within a single season. When these layers work together, they create a controlled system that resists the natural urge of the ground to shift and settle.
How to Fix an Uneven Paver Driveway: A Systematic Repair
A common mistake in driveway maintenance is treating a dip as a surface-level issue. Simply pouring more sand into a low spot is a temporary patch, not a permanent repair. To achieve a result that lasts, you must address the structural failure in the foundation. This systematic approach focuses on preventing paver driveway sinking by restoring the integrity of the sub-base and bedding layers. If you don’t fix the underlying cause, the same stones will settle again within months.
The “Lift and Reset” Methodology
A professional repair begins with the careful removal of the existing stones. We follow a specific sequence to ensure the surrounding area remains undisturbed. First, use a specialized paver extractor tool. This allows you to lift individual stones vertically without chipping the edges of the surrounding pavers. Next, clear at least a 12-inch perimeter around the affected area. You must expose enough of the stable base to create a seamless transition between the old and new sections.
Once the pavers are removed, scrape away the old, contaminated bedding sand. Over time, fines from the sub-grade can mix with this sand, causing it to lose its structural capacity. After clearing the debris, inspect the underlying gravel. If the base has settled, you’ll need to add fresh aggregate before leveling the area with a screed rail. This ensures the bedding layer is perfectly flat and ready for the pavers to be reintroduced in their original pattern.
Compaction Techniques for Small Repairs
The most frequent point of failure in residential repairs is insufficient compaction. Hand tamping lacks the force required to reach the high density needed for vehicular traffic. For any driveway-grade repair, you must use a vibratory plate compactor. This machine uses high-frequency vibration to lock the aggregate particles together, eliminating the air pockets that lead to future settling. It’s a non-negotiable step for a professional-grade result.
Always use a protective mat on the compactor when working on the surface of the pavers to prevent scuffing or cracking. Compaction must happen at both the base and paver levels. First, compact the augmented gravel base. After resetting the pavers and sweeping in new polymeric joint sand, run the compactor over the stones again. This dual-stage process vibrates the sand deep into the joints, creating the mechanical interlock necessary for a level, stable surface that can withstand the weight of a vehicle.
Evaluating the Damage: When to Repair vs. When to Replace
Deciding between a targeted repair and a full replacement is a critical step in preventing paver driveway sinking from becoming a recurring financial drain. A single localized dip is often the result of a specific, isolated issue such as a leaking irrigation line or a small area of soft soil. These are prime candidates for the “lift and reset” methodology. Patching isn’t always the right answer. If you see widespread movement across the entire surface, you’re likely dealing with a systemic foundation failure that no amount of patching can resolve.
The condition of the stones themselves tells the story of what’s happening underneath. If you notice cracks in the pavers, it’s a definitive sign of base failure. High-quality concrete pavers are designed to withstand significant pressure, but they rely on a rigid foundation to distribute that weight. When the base shifts or collapses, the pavers lose their support and snap under vehicular loads. You should also consider the age of your installation. Most professional paver driveways have a functional lifecycle of 20 to 25 years. If your driveway is approaching this milestone, a full replacement is often more cost-effective than chasing individual repairs that won’t match the weathered look of the original stones.
Signs of Systemic Base Failure
Identifying the pattern of sinking helps determine the severity of the damage. Rutting, which appears as two distinct depressions where car tires travel, indicates that the original sub-base was likely undersized or poorly compacted for vehicular weight. A “wave” pattern across the entire driveway suggests that the aggregate layers have shifted due to poor drainage or the lack of a geotextile fabric. You should also watch for widespread joint sand loss and persistent weed growth. These symptoms indicate that the interlock between pavers has been compromised, allowing water to reach the bedding sand and liquefy the foundation.
The True Cost of DIY Fixes
While a DIY approach might seem economical, it often ignores the specialized tools and engineering required for a professional result. Renting a commercial-grade vibratory plate compactor and a masonry saw adds up quickly. More importantly, a homeowner might fix the visible surface while leaving an active drainage problem untouched. This guarantees that the sinking will return. When evaluating your options, use the Bayside Pavers 25-year warranty as a benchmark for what professional quality looks like. A project built to this standard eliminates the need for constant maintenance and provides long-term peace of mind.
If you’re unsure whether your driveway can be saved or if it’s time for a fresh start, a professional assessment is the safest path forward. We provide transparent evaluations to help you protect your home’s value. Contact us today for a driveway installation consultation to review your options and secure a level surface for the future.
Ensuring a Lifetime Driveway: Professional Standards and Warranties
The long-term success of preventing paver driveway sinking depends entirely on the expertise of the team executing the plan. Engineering a surface that withstands the test of time requires a deep understanding of local Bay Area geology. Our region’s expansive clay soils demand specific technical adjustments that a general laborer might overlook. Hiring a licensed hardscape contractor ensures that your project follows rigorous industry standards rather than shortcuts that lead to failure within a few seasons.
A dedicated project manager is a critical asset during the construction phase. This individual takes full ownership of the timeline and quality control, specifically ensuring that every lift of aggregate meets compaction requirements. Voids in the sub-base are the primary cause of sinking, so having a manager obsessed with follow-through is vital. We provide upfront, all-inclusive pricing to eliminate the “surprise” costs that often surface during excavation. You deserve a partner who values your financial commitment and provides a clear, documented path to a level surface.
Your investment should be protected by more than just a handshake. A 25-year warranty serves as a benchmark for professional quality and accountability. It shifts the risk from the homeowner to the provider, ensuring that the structural integrity of your driveway remains a priority for decades. This level of protection is only possible when a contractor has total confidence in their repeatable system for success.
What to Ask Your Hardscape Contractor
Before signing a contract, you must verify that the provider understands the technical requirements of a vehicular surface. Use these specific questions to vet their expertise:
- “How many inches of base material do you use for driveways?” A professional answer should be a minimum of 8 to 12 inches of compacted aggregate.
- “Do you use geotextile fabric between the soil and the base?” This is a non-negotiable requirement for preventing base contamination in clay-heavy soils.
- “Is your pricing all-inclusive of drainage and site prep?” Ensure there are no hidden fees for grading or water management solutions.
The Bayside Pavers Difference
We’ve developed a controlled, 3-step process designed to eliminate the typical anxieties of home improvement. It begins with a detailed consultation to assess your property’s specific drainage and soil needs. We then provide all-inclusive pricing that covers every aspect of the project, from excavation to the final sweep of polymeric sand. Finally, our disciplined build team executes the installation with meticulous attention to detail. We proudly serve homeowners in Walnut Creek, San Ramon, and Napa, bringing local geological expertise to every project.
Ready to secure your home’s curb appeal and eliminate trip hazards for good? Schedule your free design consultation with Bayside Pavers and experience the peace of mind that comes with a professionally engineered driveway.
Secure Your Home’s Foundation and Curb Appeal
A level driveway is the result of disciplined engineering and uncompromising standards. You now understand that preventing paver driveway sinking isn’t about the stones themselves; it’s about the precision of the sub-base and the rigorous management of water runoff. By prioritizing high-density compaction and utilizing woven geotextile fabrics, you can eliminate trip hazards and standing water for good. You don’t have to settle for a surface that shifts with every seasonal rain cycle.
We provide a controlled system for success that protects your property value and your peace of mind. Our all-inclusive pricing model eliminates hidden costs, while a dedicated project manager for every build ensures every layer of your foundation meets structural requirements. Every project is backed by our 25-year installation warranty, giving you total confidence in the longevity of your investment. Take the first step toward a permanent solution and Get a Free Estimate for Your Driveway Repair today. Your home deserves a foundation built to last a lifetime.
Frequently Asked Questions
How much does it cost to fix a sinking paver driveway?
Repair costs depend on the square footage of the failure and the depth of the required excavation. A localized repair involving a few dozen pavers is naturally less intensive than a systemic base failure requiring a full lift and reset. Factors such as site access, the condition of existing pavers, and the need for new drainage solutions will dictate the final scope of work for your project. To gain a broader understanding of industry standards, find out more about Project-based design and installation fees for outdoor living construction from Piazza Property Pros.
Can I just put more sand over the sunken pavers?
No, adding sand to the surface is a temporary aesthetic fix that ignores the underlying structural failure. Sinking is almost always caused by a compromised base or saturated bedding sand. If you don’t excavate the area and re-compact the foundation, the new sand will eventually wash away or settle. This causes the pavers to dip again within a few months, leaving you with the same problem.
How deep should the base be for a paver driveway in the Bay Area?
A residential driveway in the Bay Area requires a compacted aggregate base of 8 to 12 inches. This depth is necessary to bridge the expansive clay soils common in cities like Walnut Creek and San Ramon. Using a thinner base often leads to rutting and vertical shifting as the clay swells and shrinks during California’s seasonal rain cycles. Proper depth is the most critical factor in preventing paver driveway sinking.
Is it normal for a new paver driveway to sink slightly?
No, a professionally installed driveway should not experience visible sinking or settling after completion. While minor joint sand consolidation is expected, any vertical movement indicates a failure in sub-base compaction or edge restraint installation. If your new driveway shows dips or pooling water, it suggests the foundation did not reach the required density during construction. A stable driveway should remain level under vehicular loads from day one.
What is the best sand to use for preventing paver sinking?
High-quality polymeric sand is the best material for locking joints and maintaining surface stability. Unlike standard play sand, polymeric sand contains binders that harden when activated by water. This creates a semi-rigid seal that prevents water from reaching the bedding layer and stops the migration of joint material. Keeping the joints full is vital for maintaining the mechanical interlock that keeps the entire surface level.
How do I know if my driveway sinking is caused by a water leak?
Sudden, localized sinking near irrigation lines or main water pipes often points to a subsurface leak. You can identify this by checking for unusually lush patches of grass nearby, soft spots in the soil, or a spike in your water bill. Constant saturation from a leak liquefies the bedding sand and washes away the sub-base, leading to a rapid collapse of the paver surface regardless of original compaction levels.
Will sealing my pavers prevent them from sinking?
Sealing protects the paver surface and stabilizes joint sand, but it cannot prevent sinking caused by a failing foundation. Sinking is a structural issue occurring beneath the pavers, whereas sealing is a topical treatment. While a sealer with a joint stabilizer can help keep polymeric sand in place, it will not compensate for an undersized base or poor soil compaction. You must fix the foundation before applying any surface treatments.
How long does a professional paver driveway repair take?
Most localized paver repairs are completed within one to three days. The timeline depends on the size of the affected area and the extent of the base damage. A systematic repair involves extracting the stones, clearing a perimeter, re-compacting the aggregate, and resetting the pavers. Larger systemic failures that require a full driveway replacement will naturally take longer, typically one to two weeks depending on the total square footage.

Article by
Adriana Esposito
Adriana Esposito is the owner of Bayside Pavers, a woman-owned outdoor living company serving the San Francisco Bay Area. With over 16 years of experience, she specializes in designing and building custom paver patios, driveways, outdoor kitchens, retaining walls, artificial turf, and other outdoor living spaces. Through this blog, she shares expert tips, design inspiration, and practical advice to help homeowners create beautiful, lasting outdoor spaces.